Frequently Asked Questions
AllCounted was built to be easy to use, but if you do get stuck along the way, we have added helpful notes throughout. Most pages have a Read this first link and instructional text with helpful information for new users. Many data fields also have tips with helpful explanation. We also have a guide for advanced features. If you don't see your question here, please contact us and we will respond in a timely manner. Thank you for helping us better serve you!
Registration and Account Management
You can create a new account by clicking the Sign up link at the top of the page and entering the required information, which is very minimal. No personal address, phone number, or form of payment is needed.
You don't need to type anything to register on our website if you sign up with your account on one of the listed websites. Additionally, you can easily sign in to our website in the future simply by clicking on the website you used.
Yes. You must have an AllCounted account to create a survey. Creating an account is free and requires only a valid email address.
No. Most surveys do not require participants to have accounts at AllCounted. However, when you create your survey, you can specify whether or not your participants are required to have an AllCounted account. Requiring an account helps increase a survey's privacy and security by limiting participation to only account users, but having an account could be an inconvenience to some people, making them reluctant to take your survey.
Such information will be helpful when you create surveys. For example, AllCounted requires you to select the time zone for your survey to end. If you have already done so in your account settings, then AllCounted automatically uses that as the default for your surveys.
When your survey is displayed to participants, your display name can be shown as the survey creator. Additionally, the display name is used to show who you are when you leave comments on our website.
You can change your primary email address by following these steps:
- Go to the Email Addresses page under Account Settings.
- On this page, add the email address you want to use as your new primary email address. A verification email will be sent to this address. Click on the verification link in the email.
- Refresh the Email Addresses page, and there will be a star icon in the Action column for this email address. This icon allows you to replace your current primary email address with a new one.
Note that your account password remains the same after changing your primary email address. You can always delete an email address that is not the primary one.
Deleting an account is easy. Sign into your account and then click Account Settings, Delete Account.
Please note that deleting your account will permanently remove your account, surveys, and the responses they collected.
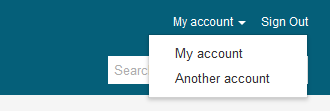
If you don't sign into our site through your Google account, then you need to have an email address and password on our site. Please click Account Settings, Email Address to see whether the intended email address is on this page. If not, add it. If it is not verified, please verify that you own it from within the verification email sent to this address. Next, you need to make sure that it is your primary email address in your account. If not, you should be able to see it, similar to the following, on the Email Address page.

Click the star icon to make it your primary email address. After that, please sign out of our site and then go to the password reset page to set the password for the primary email address.
Note that if your primary email address is not the one associated with your Google or other accounts, then after this change, you will not be able to sign into our site through such an account unless you make it the primary email address again.
Privacy and Security
We have taken every precaution to protect our users' information. In addition, we do not ask users for any sensitive information such as names, addresses, phone numbers, or financial data.
At AllCounted, your data is protected both online and offline. Online, our entire website is protected using TSL/SSL encryption software. Thus, the data of all your online activities such as registration, sign-in, survey creation, etc. is protected. To learn more about TSL/SSL, follow this link: https://en.wikipedia.org/wiki/Transport_Layer_Security. On each page of AllCounted and at any moment, a user can only access a survey or its results they are authorized to access.
Offline access to users' data is also restricted. AllCounted operates in a secured and locked facility. Only personnel with proper security clearance for specific job tasks have access to these restricted areas. Our employees are trained in the best practices in security and privacy.
Here is how we handle the confidentiality of user data:
- Our system is maintained in a secured facility that only authorized and trained personnel can access.
- We do not view, use, change, delete, or sell the surveys or survey results of our users.
- We are the only site that offers various tools to survey creators to secure their survey data. Survey creators can specify whether their surveys are searchable or private on our website, limit access to their surveys through various methods, decide whether or not to share survey results with other people as well as what results to share, at what time, and with whom. We are very innovative in this aspect, and no other survey site offers what we have.
- In case you still don't feel safe about having data in our system, you can export your data after your survey ends and delete your survey and its results from our website instantly.
We will not delete any data of those users who follow our Terms of Use. We intend to keep user data indefinitely and make it accessible online all the time.
Making a survey private means preventing the survey and its results from being known to the public. Making a survey secure means restricting the access to a survey and its results to designated people. The two are related and different. At AllCounted, making a survey private is making it not searchable, and making a survey secure is using the methods of accounts, access codes, email addresses, etc. to limit who can access a survey and its results.
A non-searchable survey is private and it can't be found through search or browsing on our site. When a survey is made non-searchable, its results are completely private too by default, and they are only accessible to its creator. Note that if a participant shares a non-searchable survey with unintended people, then they may be able to take the survey if it doesn't have the appropriate restrictions to limit participants.
Yes. When creating a campaign for your survey, you can make it private by making it non-searchable, and then you can further restrict its participants and the people who can view its results as well as what results they can view. You can also make results totally private and only accessible to yourself.
We provide two options to have others help you build and manage your surveys. One way to do this is with co-authors. Co-authors can only access a survey and its results for which they are designated as co-authors. Another way is with team members. Team members are able to access all your surveys and their results.
Whether your response is anonymous depends on how the survey creator configures their survey. If you have any concern about your privacy, you should contact the survey creator. Please note that you can ignore a request for survey participation or abandon a survey during your participation.
We provide the survey creator with a participant's computer address and geographic location derived from that such as country and state. We may also provide the access code or email address associated with a response depending on how the survey creator configures their survey.
As a survey creator, you can disable IP address tracking to ensure participant anonymity. To do this, open your survey in Advanced mode, go to the Settings page under Design, and uncheck the option labeled "Record IP Address for Participants."
Creating Surveys
AllCounted is a powerful and flexible system for creating surveys. From a simple single-page Yes-or-No poll to a multi-page questionnaire, you can develop whatever type of survey best fits your needs using different question types such as multiple choice, free text, ranking, table of choices, and skip logic (also called branch logic) that can skip questions or pages based on the rules you set for certain answers. Whether you are a business interested in customer or employee satisfaction, a student collecting data for a project, a scientist recording input from research subjects, a non-profit in need of online forms, a political organization looking for constituent feedback, or an individual compiling feedback on a community issue, we are at your disposal.
Whether you are new to creating surveys or not, it is always a good idea to search AllCounted for surveys that are similar in content or format to the one you have in mind. You may find that someone has already asked the questions you want to ask and that the results are already available. If not, there may be existing similar surveys that can help you formulate your own or be copied as a template for your survey.
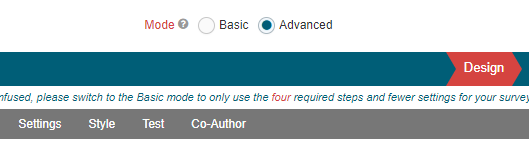
We understand that many people want to create a simple survey and make it available to participants right away. For these users, we provide the Basic mode, in which all the advanced survey settings and features are either hidden or preset with the most commonly used values.
On the other hand, some survey professionals and advanced users require more powerful and flexible features. Our Advanced mode is for them. In the Advanced mode, the survey creator has access to all the features of AllCounted, including many innovative and powerful functions such as campaigns, participant restrictions, results sharing, cross tabulation, statistical tools, private share, social networking, etc.
Note that we have also made it easy to switch between these two modes. You can start a survey quickly in Basic mode and then refine it as needed in Advanced mode, or vice versa.
No. As part of our Terms of Use, all survey creators agree to let you reuse their questions for your own survey if their surveys are accessible to you. You can either manually recreate each question in your survey or duplicate them all at once through survey templates.
Yes. Go to your account and click Surveys, My Surveys on the left-hand side menu to show a list of your surveys. In the Action column, click the Duplicate button for the survey you want to copy, and then you can start modifying the new survey. Please note that survey rules and responses aren't duplicated for the new survey.
When editing a question, you can see a tab called Validation. Please don't check "Answer Required" on it.
Yes. Open your survey. Click Design, Questions. Now you have a list of questions. For each question, you can do a few things. One of them is "Duplicate". Clicking on it makes a copy of the question. Please note that survey rules on the question aren't duplicated.
A single survey can have up to 300 questions and 100 pages.
No. There is no limit on the number of surveys you can create at AllCounted or the number of responses a survey can receive.
Yes. You can change survey questions and their settings at any time, even after your survey is live and has received responses. If you need to change questions after your survey has received responses, keep the following in mind:
- There is no effect on results if your survey hasn't collected any responses yet.
- If your change is text only, there will be no effect on your survey's results.
- There will be no effect on already collected responses if you simply reorder questions. However, reordering questions may affect future responses if the survey uses skip rules or removal rules or the order of questions can affect how participants respond.
- Deleting a question removes the answers to the question from all responses. The answers to other questions will not be affected.
- Deleting an answer choice of a multiple choice question removes the selection of that choice from all responses. The selection of other answer choices will not be affected. The same goes for Drag and Drop Ranking questions and Table of Choices questions.
The first step is to enter the text of your question.

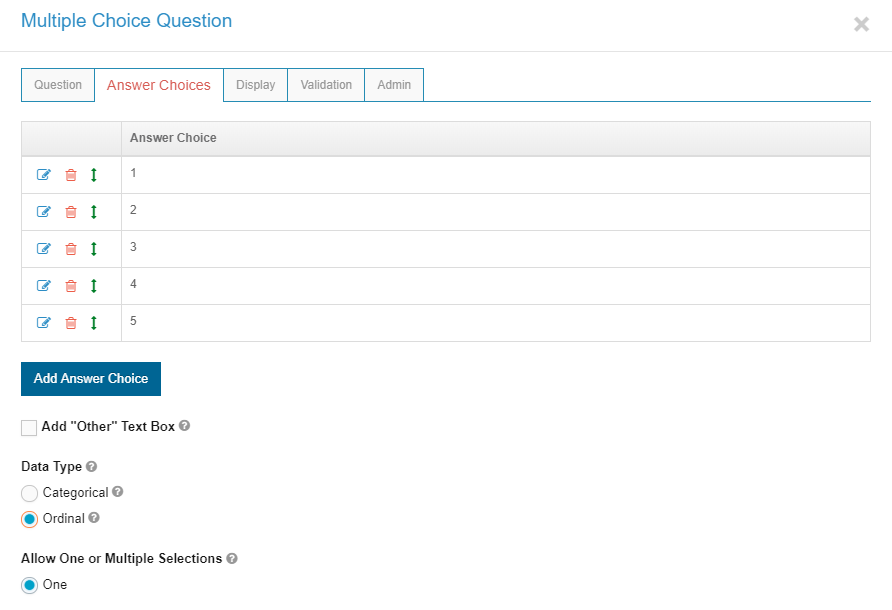
The second step is to enter the answer choices of your question. You can enter them all at once, one on each line. When you are done, click Save.
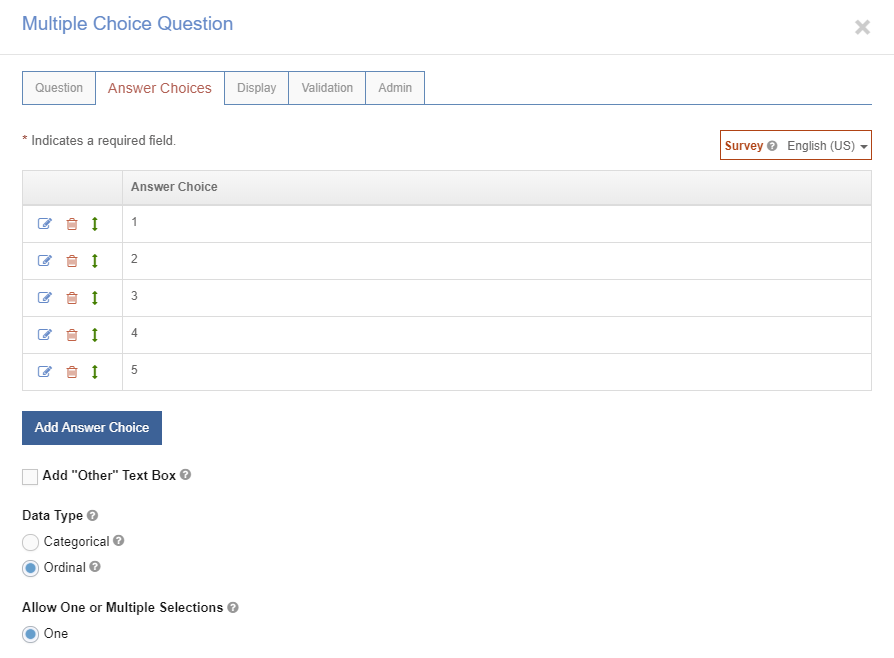
The next step is to select Ordinal for Data Type, and click Save.
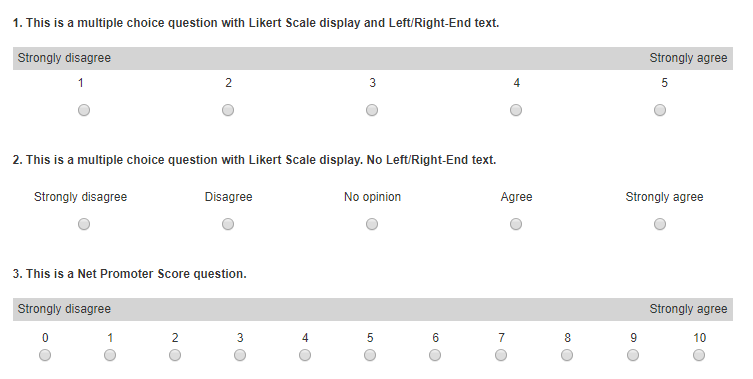
The last step is to click the Display tab and select Likert Scale for "Display of Answer Choices". You can enter text that will display at the left and right ends, but that is optional and depends on the answer choices.
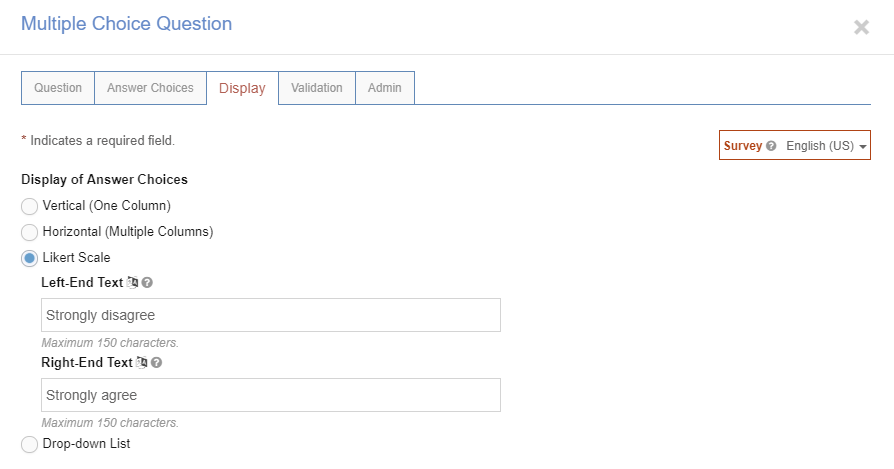
The following are examples with and without left-end or right-end text:
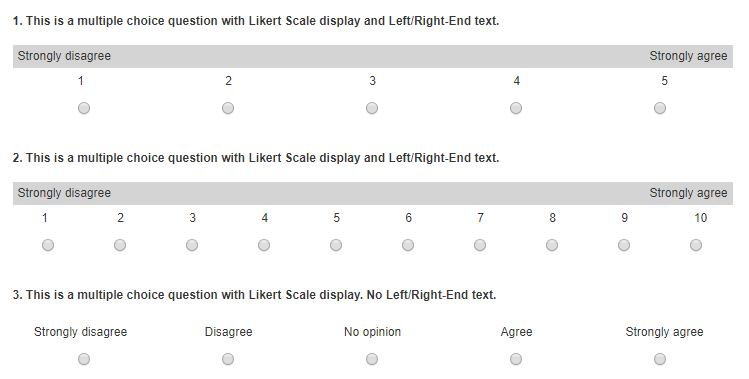
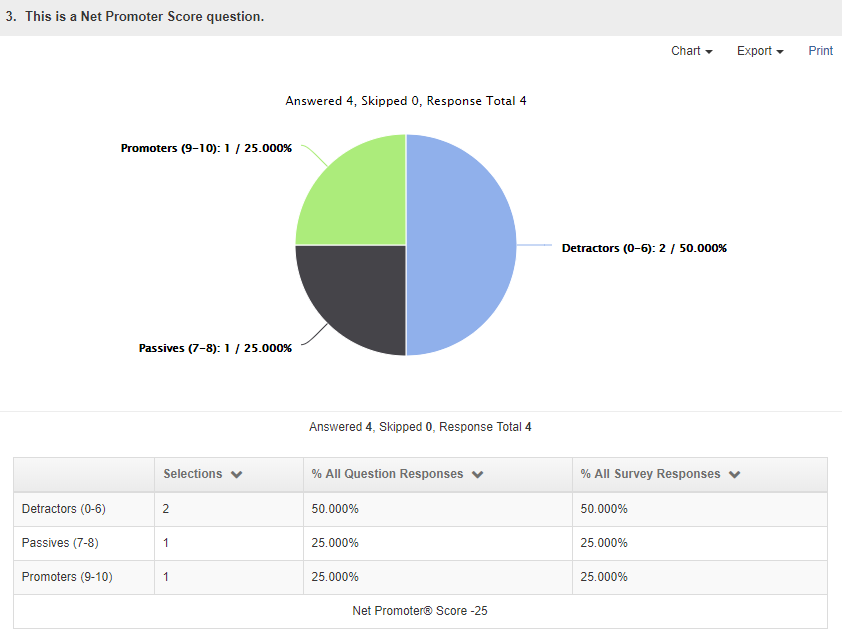
The Net Promoter Score (NPS) question is primarily used by businesses to gauge customer loyalty by measuring how likely a customer is to recommend their products or services. An NPS question uses a set scale of 0-10, and answers are grouped into Promoters (9-10), Passives (7-8), and Detractors (0-6) in order to calculate a value called the NPS, which ranges from -100 to +100. A common NPS question is: "How likely are you to recommend our product (services, company, etc.) to a friend or colleague?".
If a question isn't concerned with customer loyalty but intends to gauge participants' feelings on a statement, it should use the multiple choice question with or without Likert Scale display. In this situation, a multiple choice question asks participants to select their level of disagreement or agreement on a statement. Example questions include: "How strongly do you ...", "How confident are you ...", "Please indicate the level of ...", etc. The choices don't have to be numbers from 0-10, which an NPS question requires. They can be numbers such as 1-5 or a group of texts such as Strongly Disagree, Disagree, No Opinion, Agree, and Strongly Agree.
The following sample questions show the difference between the two types of questions in display.
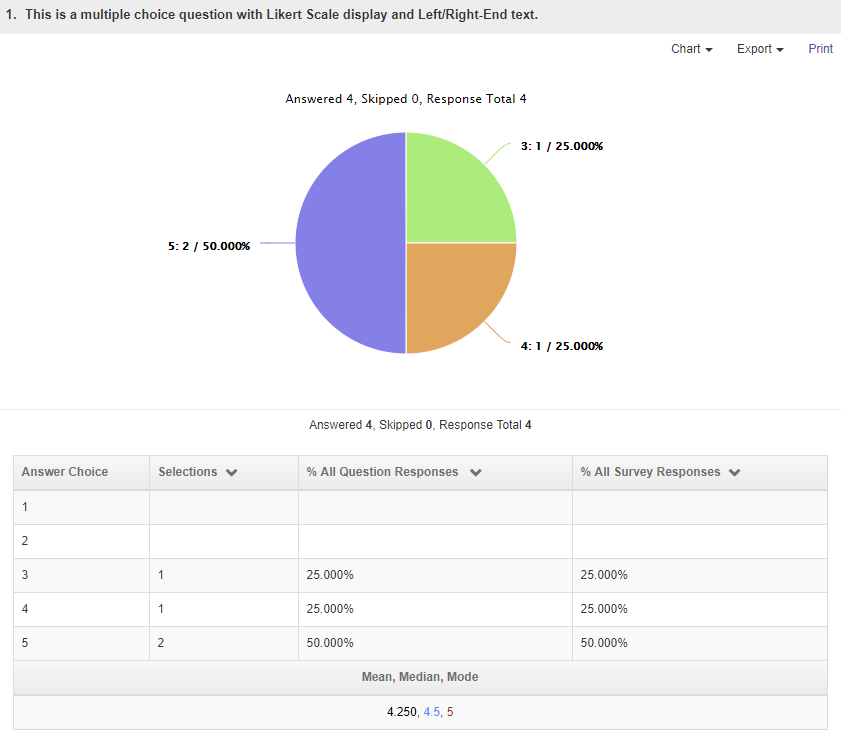
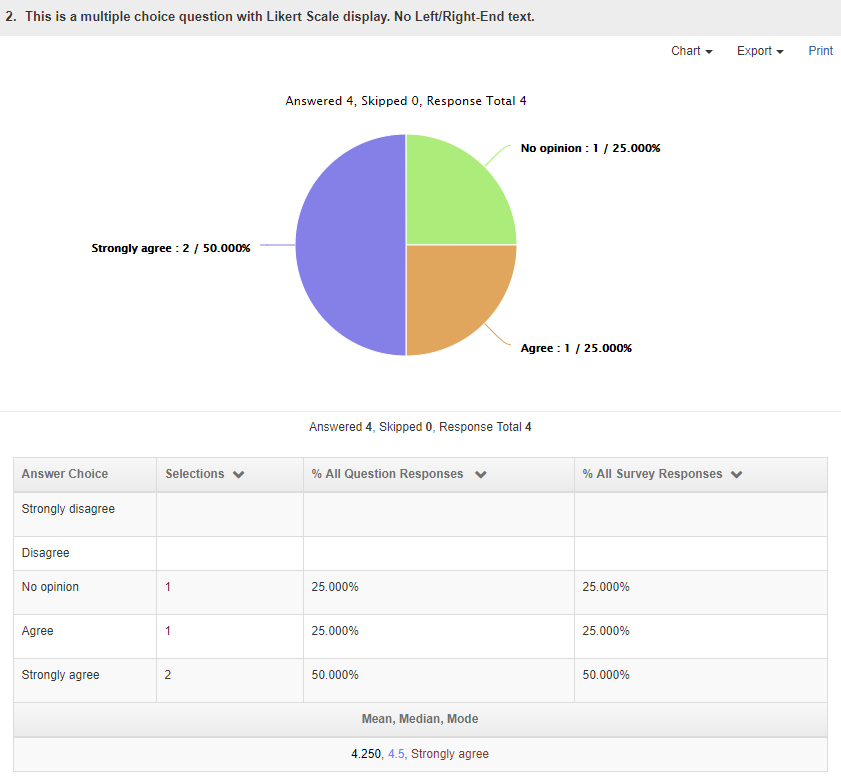
In analyzing survey results, the two types of questions are treated differently too. Multiple choice questions have the percentage of selection for each answer choice, and can have statistics for mean, median, and mode. The analysis of a Net Promoter Score question puts the percentage of selection into three groups and calculates a Net Promoter Score for the question. Please see the following screenshots:
Yes. You can add images to questions, the answer choices of multiple choice questions, and other places. In those places, you'll see a row of tool icons at the bottom of your text area. One of them is for inserting images. Clicking on it displays a popup. Please see the following screenshot:
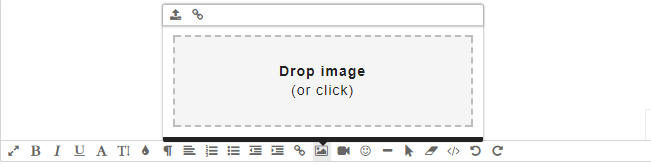
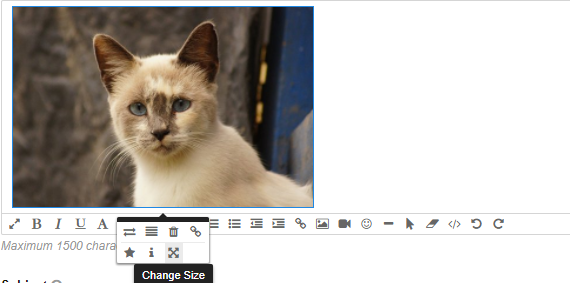
You can upload an image from your computer or drag and drop it in the indicated area. You can also insert the link of an online image by clicking the "link" icon in the upper-left corner of the popup. You can even open your image in Photoshop or another image-editing software, cut or crop it, and then paste it in the text area. Once your image is in the text area, you can resize it. To do that, click on the image, and you'll see a popup beneath the image asking for its size. A value between 200 and 800 is usually appropriate for image width.

If you insert the link of an online image, then the image can reside on any website. One popular place people use to upload their images online is imgur. We recommend it to our users because it is free and easy to use.
Please note that we only support JPG, PNG, and GIF images. Images that are uploaded or pasted can't be larger than 800K, but there is no restriction if you insert the link of an online image.
You need to first enter some text for the answer choice and save it. Then, you can add an image into the answer choice by editing it.
Yes. You can add the link of an online PDF to places like the survey introduction, questions, and other places where links are permitted. Click on the icon for inserting links as shown below:
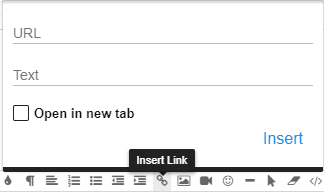
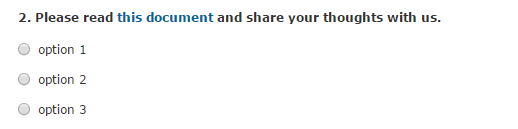
You must enter the link and the link text. Usually, you should check "Open in a new tab" so that when a participant clicks on the link, your survey page remains open as a new tab is opened to show the document. The following is an example of what a link would look like in a survey:
This process is the same for adding a link to other document types. Please note that our website doesn't store uploaded files except for images, and that your PDF must be online first. You can upload your PDF file to Google Drive, Dropbox, or other content-sharing sites and then get the link to your PDF file.
Yes. Open your survey in the Advanced mode and click Style under Design to open the style editor. Please look for the Question Number option in the Page Element dropdown. Our system is able to show correct question numbers when skip rules or removal rules are used in a survey.
You can do it in two ways. First, you can edit a question and change its font size through the editor tools. Please see the following screenshot:

However, a change made using this method only applies to one question. The second way is that you can use the Style page under Design. A change made through this page applies to all questions in a survey.
No.
Yes. To do this, you will need to upload your logo in the Account Settings section. Then, you can go to any of your surveys and add your logo on the Settings page under Design. Your logo must be added to each survey individually.
No. All our tools and services are free, and the text and our logo are the only way we'd like to be acknowledged.
In the Style page under Design, you can choose to hide the language dropdown.
Yes, you can still type your survey questions in the language of your choice. However, the Back and Next buttons, as well as displayed text such as error messages that might appear during the survey-taking process, will appear in AllCounted's default language, which is English (U.S.).
We don't offer an online translation service. You have to manually enter text for each language. You may want to use a tool such as Google Translate to help you generate translated text and enter it in your survey. Please note that no translation tool is 100% correct. You'll need to review your translated text before really using it.
Yes, in the places of a survey such as introduction, question text, answer choices of multiple choice questions, etc. you can use various text formatting tools.
Yes. You can change the appearance of your survey pages, including the colors, fonts, positioning, etc. of different page elements. Please click Style under Design. Select a predefined theme that best meets your needs, and then start modifying it to create your own. Through this option, you are also able to see how your survey will look on desktops, tablets, and smartphones.
Yes, we offer question skip rules, question conditions, question scoring rules, page start skip rules, and page end skip rules. Collectively, they are called survey rules. Please click here for more information.
Please click here for an example.
No. When a question page displays in the browser, all questions on the page are displayed and remain visible no matter how a question on the page is answered. In other words, skip rules can only direct a participant to a later page. You need to put skipped questions on a later page and then use a skip rule to skip that page.
First, you need to create conditions for each question. Then you can create a page start skip rule and select the question conditions for that rule. We support three logical methods to handle selected question conditions:
- All selected conditions are met
- At least one selected condition is met
- No selected condition is met
You need a page skip rule. You can create a page skip rule and select any of the three logical methods, but do not select any question conditions. Usually, it is a page end skip rule and the last skip rule to test on a page.
Note that a page skip rule without any selected question conditions redirects participants unconditionally. Any skip rules after it will be ignored.
Based on answers to questions, a removal rule can remove a later page or a question on a later page from display. Also it can just remove the answer choices of a multiple choice question instead of removing the whole question. Removal rules are similar to skip rules, and the difference is that removal rules only remove specified pages or questions from display and they don't skip other pages or questions between the current page and the page or question to remove. In addition, all question removal rules and page removal rules on a page are tested when the page is submitted. Their sequence doesn't matter.
Please click here about how to create removal rules.
They are different in the following ways:
- A removal rule deletes a page, a question, or answer choices of a multiple choice question from a survey. A display rule simply displays or hides them. A question made hidden by one display rule can be made to appear in a survey by another display rule.
- If multiple removal rules are applicable to the same page, question or answer choice, then the page, question, or answer choice will be removed as long as one rule is applicable. Besides, the execution order of removal rules doesn't matter. On the other hand, if multiple display rules are applicable to the same page, question or answer choice, then the most recent rule decides whether to display or hide the page, question, or answer choice. The execution order of display rules matters.
- Removal rules can only remove later pages, questions on later pages, or answer choices on later pages. A question display rule can display or hide a question or answer choices on the same page.
- Removal rules are easier to use, and display rules are more flexible.
Note that when a page is removed or hidden, it will be skipped in a survey.
Open your survey in the Advanced mode, click Design, Settings. Enter 30 in the field called Response Time Limit. If a participant can't complete your survey within this time limit, their response will end automatically and they will be redirected to a page with a message saying they have used up the permitted time for taking your survey.
Please leave this field blank if you don't need this feature.
To get contact information, you can create a text box question with multiple line display and ask people to enter the requested information, one on each line. You can also create multiple text box questions, each asking for a different piece of information. Data collected through a text box question with multiple line display will display in multiple lines on our website and in data export.
Open your survey in the Advanced mode. Under Design and Settings, uncheck Allow Comments.
You cannot transfer your questions to another user. You can create a campaign, make it searchable, and ask the user to look for your survey. Once the user finds it, the user can replicate all questions into a new survey under the user's account.
You can generate a fillable PDF of your survey to print or use offline. Open your survey and click Design, Questions. You'll see "PDF Version" as shown below. Click it to get your PDF.

You can print the questions of a survey using two methods. The first method involves utilizing the PDF option shown below. Please be aware that this approach may not replicate the exact visual layout of certain question types as they appear on the screen.
The second method is to employ your browser's print function. It is important to note that this method may not display all questions in a single printout if the survey's questions are distributed across multiple pages.
Distributing Surveys
A campaign is the application of a survey. A survey itself is just a list of questions. To collect responses, you must create a campaign, through which you are able to specify who can take your survey, when they can take it, who can view its results, etc. For one survey, you can create multiple campaigns for different periods of time, groups of participants, or other reasons. As the creator, you can view, compare, or combine the results from different campaigns of the same survey.
Distribution is a required step within a campaign and specifies how to reach potential participants. We allow you to distribute the survey through web links, email invitations, Facebook, etc. As the survey creator, you are responsible for getting your survey into the hands of your participants. For a campaign, you can create multiple distributions, and you can compare responses from different distributions or analyze them as a whole.
There are many situations where you might want multiple campaigns for a single survey. You might want to compare the responses of people living in different areas, or the responses of people before and after a certain event, such as a political election. Creating multiple campaigns allows you to separate the responses into groups that you can easily compare using our analytical tools.
For a campaign, if you want to get your survey to people through different channels, then you may want to create multiple distributions. For example, you can create a web link distribution and put the link on your Facebook page, and create another web link distribution so that you can send the link directly to participants. You can combine or separate responses from different distributions in the analysis.
The easiest way to provide access to your survey is to create a web link distribution and share it with participants. You can send the link to them or post it on the internet.
First, please make sure that the email addresses you use are correct. We constantly see emails returned to our mail server because of incorrect email addresses.
If an email address is correct, and the intended person did not receive the email, there are two possible reasons. First, the mail server on the recipient's side may be configured in a way that it rejects the emails sent from AllCounted.com. In this situation, if you can put us in touch with the administrator of the mail server, then we can work with the administrator to resolve the issue. Second, you may want to ask people who haven't received the email to check their spam box.
In many situations, it might be better for you to create a web link distribution for your survey, and send that link to people directly from your own email account instead of using our email service.
At this moment, we don't support personalized emails for each recipient. We may add this feature in the future.
We don't support automatic email reminders. However, as a survey creator, you can re-send invitation emails to those who haven't taken your survey.
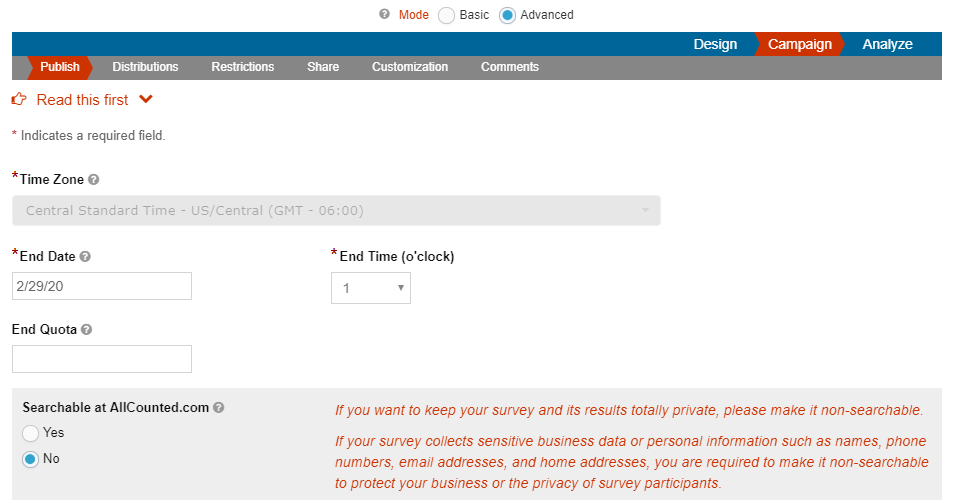
You can set up your survey so that only intended participants can take it. To make a survey private, please open your survey and click Campaign, Publish, select No for "Searchable at AllCounted.com", and click Save. This ensures that your survey doesn't show up in any search or browse on our website. If you want to further restrict who can take your survey, you have two options.
The first is to use access code, email addresses, computer addresses, etc. This option is available on the Restrictions page of your campaign. You need to open your survey in the Advanced mode.
The second is to create an Email Invitation distribution. You must know the email addresses of your participants. This option allows you to know who clicked the link of your survey and who actually took it.
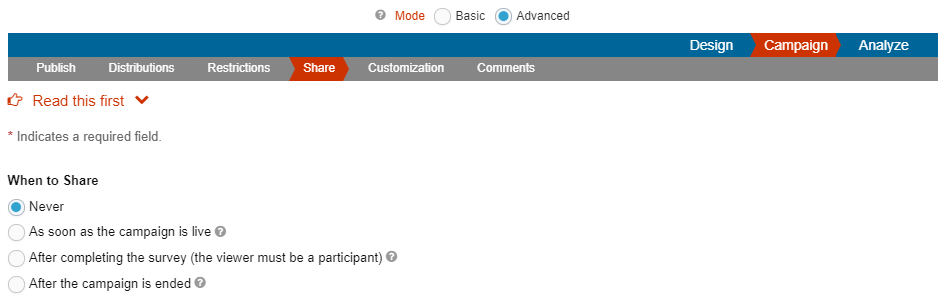
Open your survey in the Advanced mode. Click Campaign, Publish, select Yes for "Searchable at AllCounted.com", and click Save. Then, open the Share page and do the following:
- Choose any option other than Never for When to Share.
- Check Display "Take this survey"" Link and uncheck all other options under What to Share.
- Click the Save button.
After you complete these steps, only you can see the results of your survey. You must sign in to see the results.
Open your survey in the Advanced mode. Click Campaign, Publish, select No for "Searchable at AllCounted.com", and click Save. This ensures that your survey won't appear in any search or browse on our website. Further, only you can see the results of your survey, and you must sign in to see the results.
Yes. You can achieve this in two ways:
The first way is to add "myuniversity.edu" to the "Email Address Domain" field on your campaign's Restriction page. The trade-off is that your participants must register and verify their "myuniversity.edu" email addresses at AllCounted before taking your survey. The benefit is that you can securely restrict participants to "myuniversity.edu" email addresses. If you have specific "myuniversity.edu" email addresses in mind, then you can enter these email addresses in the "Email Address" field on the Restrictions page to allow only these "myuniversity.edu" email addresses to take your survey.
If you have specific "myuniversity.edu" email addresses in mind, then you have a second option. You can create an Email Invitation distribution and put these email addresses in the recipients field.
The easiest way is to get the computer IP addresses of your school's network and enter them in the field of Computer Network Address on the Restrictions page of your campaign. Note that participants have to access your survey from within the school's network.
You have a few options. The first is to create an Email Invitation distribution. Our website will ensure that each email address is used only once. You can see which email address corresponds to which response. The trade-off is that email distribution sometimes isn't reliable due to many reasons, and some mail servers may reject emails from our website.
The next option is to create a campaign that requires individual access codes or email addresses on the Restrictions page. Our website will guarantee that each code or email address will be used only once. You can see which code or email address corresponds to which response. The trade-off about the email address option is that it requires your participants to register on our website before taking your survey.
You don't need to customize your survey's title. Based on the information you provided, here is our suggestion:
- In your campaign's Restrictions page, enter some codes in the field called "Individual Access Code". Please also check "Record Individual Access Code", which will let you know which response corresponds to which code.
- Create a web link distribution.
- When you give the link (through emails, etc.) to a customer, give them a code. Please document which code was given to which customer.
- When your customers take your survey, they'll be asked to enter the code you gave to them, and our system will record the code used for a response.
- Regarding how to see the code used for a response, please see other questions on this FAQ page.
If this survey is used by many people in the sales department. Then you need to use our collaborative features. You can share with them your primary email address and password, or you can ask them to register an account on our website and add them as co-authors of the survey or team members of your account.
You could use our website for your business more creatively. For example, if each person in the sales department handles customers from a different region, then you could create one distribution for each sales person, or you could create a campaign for each of them. When analyzing results, you could separate responses or combine them together.
For important surveys, it's often the case that some people try to manipulate the results to their benefit. We provide a number of features to meet your need. First, you should use human verification, which protects your survey against possible machine-generated responses. See the following screenshot about this setup.
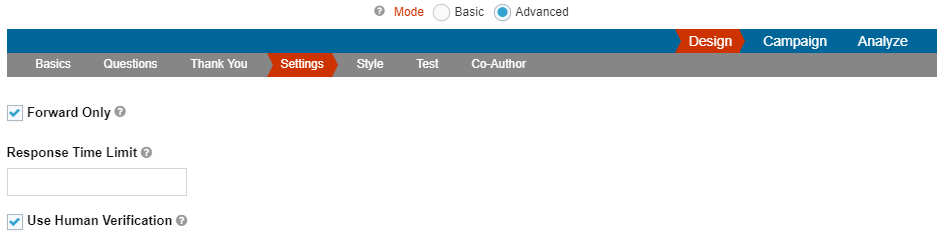
Second, when publishing your survey to make it live, you need to make it non-searchable at our website, which makes your survey known to nobody except your planned participants. The following screenshot tells you how to do it.
Third, you have to prevent participants from taking your survey more than once. Please see the following screenshot to see how to set it up.
Fourth, make sure that you are the only one who can see the results of your survey. In other words, you should share its results with nobody. See the following screenshot:
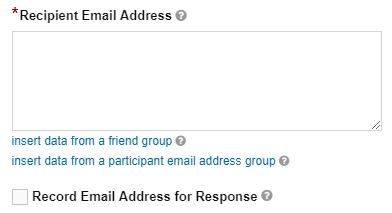
Lastly, you can distribute your survey to participants in one of two ways. You can create an Email Invitation distribution. If you want to know which response came from which email address, you need to check "Record Email Address for Response" when creating the distribution. Please see the following screenshot:
Another way is to create a Web Link distribution. Besides, you need to generate a set of individual access codes on the Restrictions page of your campaign as shown below. Then, you can give each participant the survey link and an access code through email or some other ways, which could be too much work if you have a large number of participants.
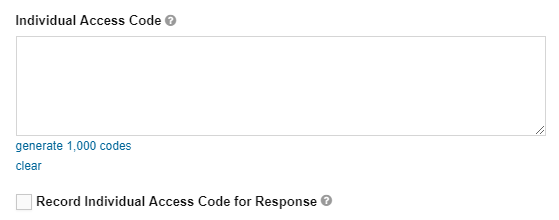
If you want to know which response came from which access code, please check "Record Individual Access Code for Response".
Let's assume that the email addresses you used in your survey are correct. Then, here are the possible reasons why you've got few responses:
- The invitation email sent from our site is rejected by a recipient's email system.
- The email ends up in a recipient's spam box, which could be the case for many people.
- A recipient received the email but didn't take it because he or she doesn't trust the source of the email, which is our site.
- A recipient received the email but didn't notice it because it is embedded among many junk emails.
- A recipient received the email but treated it as a junk email.
Research has shown that the response rate regarding email invitations from unknown sources is very low. Based on our experience, an Email Invitation works more effectively if it targets the people who know you and you send them an advance email to let them know what is coming and ask them to pay attention to the email and find it and take your survey.
Note that in most cases, you don't need to create an Email Invitation distribution. You may get a better response rate if you create a Web Link distribution and send the link to your survey to participants through your own email account.
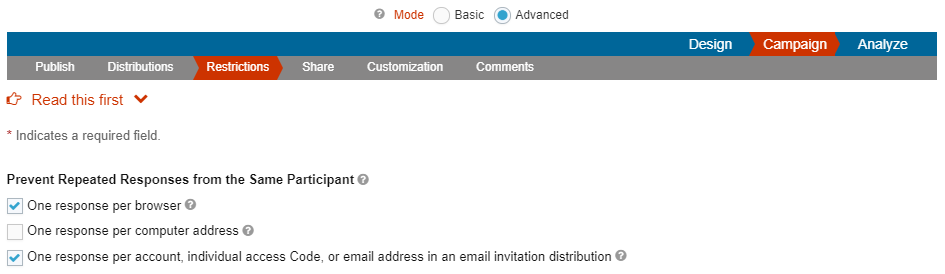
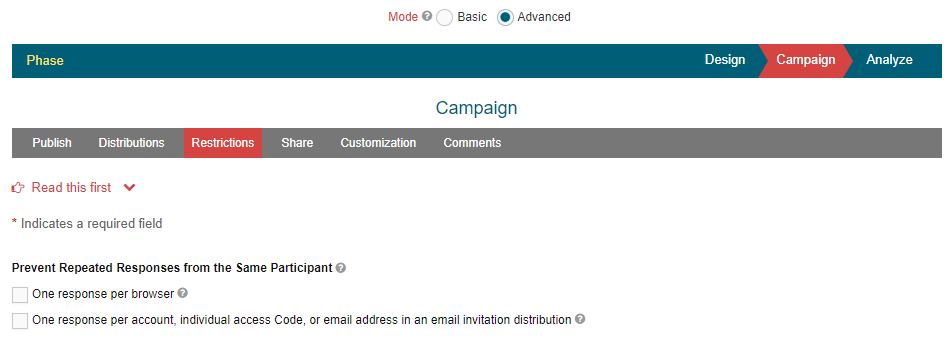
It appears that people in your school are trying to fill out the survey on the same computer. In this case, the survey creator must set up the survey to permit repeated responses from the same browser, computer, or user account. To do this, open a survey in the Advanced mode, click Campaign, open a specific campaign, click Restrictions, and uncheck the following options under "Prevent Repeated Responses from the Same Participant":
- One Response per Browser
- One Response per Account, Individual Access Code, or Email Address in an Email Distribution
Please use the following screenshot to find these options.

If you manually enter those responses on the same computer, then your survey must be set up to allow repeated responses from the same browser, computer, or user account. To do this, open a survey in the Advanced mode, click Campaign, open a specific campaign, click Restrictions, and uncheck the following options under "Prevent Repeated Responses from the Same Participant":
- One Response per Browser
- One Response per Account, Individual Access Code, or Email Address in an Email Distribution
Please use the following screenshot to find these options.
You can allow yourself to enter multiple responses to your own survey. Open a survey in the Advanced mode, click Campaign, open a specific campaign, click Restrictions, and uncheck the following options for "Prevent Repeated Responses from the Same Participant":
- One Response per Browser
- One Response per Account, Individual Access Code, or Email Address in an Email Distribution
Please use the following screenshot to find these options.
Yes, as long as a participant uses the same browser when coming back to complete your survey. This feature is very helpful to long surveys.
We provide a number of security measures that survey creators can use to limit who can take their surveys and see results. The creator decides a) whether a survey is searchable, b) who can take it, and c) who can see its results. If you can't find that survey, please ask your friend whether it's searchable and whether you have access to take it. These security measures can be changed at any time and become effective immediately, so allowing you to take the survey should be an easy fix.
You have a few options to track which response came from which person:
- Use a Text Box question in your survey to ask people to enter their identifying information.
- Use the Email Invitation distribution. This is the most commonly used method. You need to check Record Email Address for Response.
- On the Restrictions page of your campaign, use individual access codes. You need to check Record Individual Access Code for Response.
- On the Restrictions page of your campaign, use email addresses. This option requires survey participants to register at AllCounted before taking a survey.
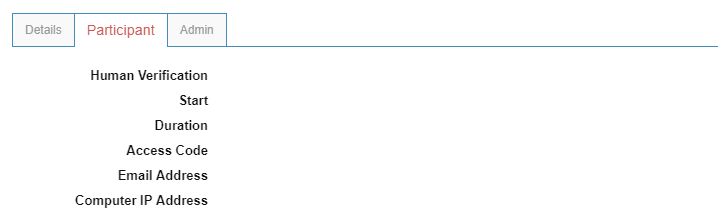
To see the source of a response, you need to open your survey, click Analyze, Results, Individual Responses, and the Apply button. There is a column called Action for each response, and you can click on the Details button to see the details of a response. The following screenshot shows where to find the email address or access code associated with a response:
Please note that if you're contacted by survey participants about privacy, you're required to truthfully tell them about whether and how you're tracking their responses.
Yes. For one survey, you can create multiple campaigns or distributions, targeting the same or different groups of people at the same or different times. This allows you to see how respondents' answers to a survey can change over time, or compare responses between different groups. For the survey analysis, you can view combined or separate results. You can even compare results from different campaigns or distributions side-by-side. You can also export combined or separate responses.
If your survey is still live, then you can extend it by entering a new end date. You can do this by opening your campaign, clicking Publish, entering a new date, and clicking the Update button. If your survey has already ended, then you can enter a new date by following the same steps and clicking the Publish button.
A campaign can be live as long as six months. At any time, you can come back to the system to update its end date so that it can stay live for a maximum of another six months from the date of update. You can do so repeatedly with no limitation. So, your survey can go on indefinitely. We feel that the six-month requirement is reasonable because any responsible survey creator should come back to the system to review their survey and results at least once every six months.
Website embed distribution is available only when you work on your survey in the Advanced mode.
We don't have this feature at this moment. The reason is that a survey could produce a large number of responses, which means a big burden on our system to generate and send out so many emails. In addition, the email service providers for the survey creator may deem us as a source of spam. Further, it can unnecessarily inundate the survey creator's mailbox.
As the survey creator, you can create a web link distribution for your survey and post that web link, along with the information on your survey, on any web page. When people visit your web page, they can follow the link to your survey at AllCounted. If you have control of the content of a web page, you can also embed your survey (not as a web link) into the page by creating a website embed distribution. That way, participants don't have to come to AllCounted to take your survey. Note that survey results can only be shown at AllCounted's website.
Two conditions must be met for a survey to appear in the search results under "Find by" Subject, Country, Year, or Language. First, the survey must be searchable, which is specified in a survey's campaign. Second, the website visitor must meet the participant restrictions or share requirements that are set by the survey creator in the campaign.
The surveys displayed under "Trending" are a special case. First, they have to be searchable and live. In addition, there can't be any participant restrictions in a survey's campaign, and the results have to be shareable with the public. These surveys are usually geared toward important issues with broad public interest.
Yes. Open your survey in the Advanced mode, click Settings under Design, and check "Receive Notification Emails about New Responses". Notification emails will be sent a few times a day when there are new responses.
Survey Results
You can use the filter to only look at the results from the list of those responses that selected Yes on your multiple choice question. You can do so by opening your survey in the Advanced mode. Click Analyze and the Question menu as shown in the following screenshot:
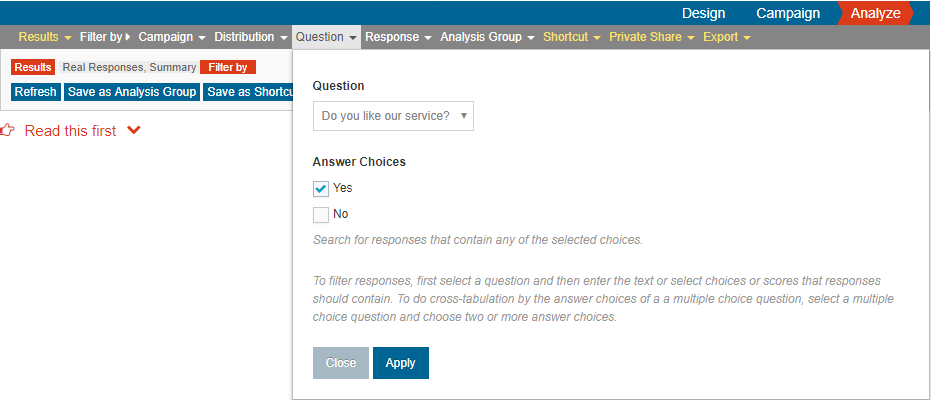
Select the Yes/No question from the Question dropdown list, and you will see the Yes/No choices of this question. Select Yes and click the Apply button. Then you will only see the results from the responses with Yes selected on your multiple choice question. Regarding this filtered list of responses, you can perform various operations, including exporting them into a file.
Yes, you can. Use the first question as the filter to find your results and save them into an analysis group. Then, use both the analysis group and the second question as the filters to produce the desired results. You can follow this method to filter results based on more questions. Note that our system doesn't support using two questions directly to filter results.
Yes. Please click here for more information. Please note that you can do cross tabulation not only by questions, but also by campaigns, distributions, or analysis groups.
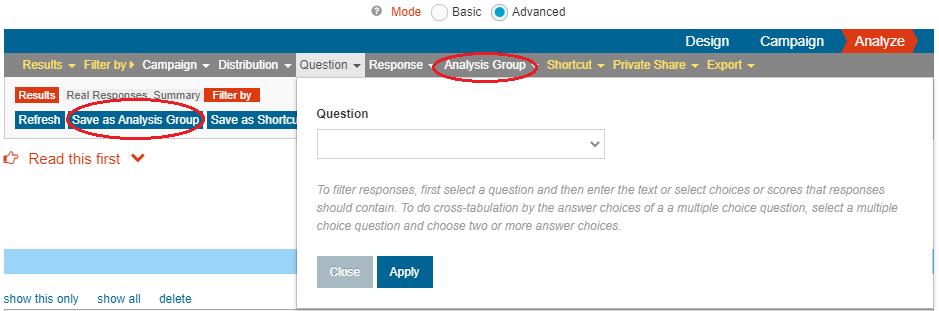
If used properly, cross tabulation with analysis groups can be a powerful analytical tool. It takes two steps. The first step is to create analysis groups. Find a group of responses that you would like to put together in a group. You can use filters to find the responses that meet your conditions. Then, click "Save as Analysis Group" to give the group a short, descriptive name. You must create at least two analysis groups. Please note that a response can only belong to one analysis group, and analysis groups can never overlap in their responses.
The second step is to click Cross Tabulation under Analyze, Results, View. Then, click "By Analysis Groups", and our system will automatically show the results of different groups side-by-side for each question. You can easily see how responses vary between groups.
You can use the question as a filter to find the desired responses and save them as an analysis group. After that, you can proceed to cross-tabulation with the analysis group as a filter.
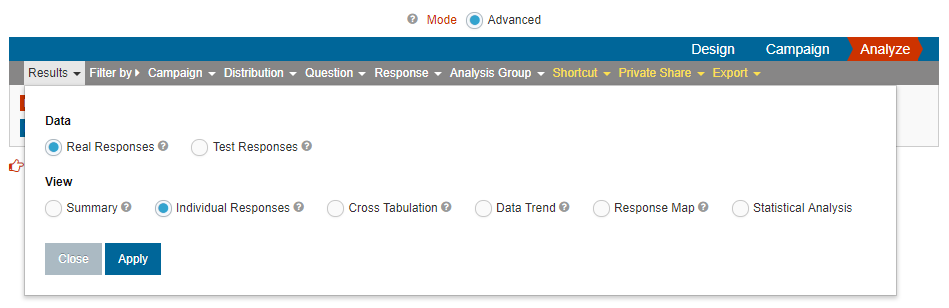
First, you have to create two Text Box questions to collect numbers from participants. You must specify that the data type is "Quantitative" for the questions. You should also specify validation requirements regarding what numbers (integers or decimals) to collect or the data range. Non-numeric data entered by participants will be eliminated during regression analysis. After you collect enough data, you can open your survey, click Analyze, Results, Statistical Analysis, and then select linear or polynomial regression, and then click the Apply button. You'll be asked to select a Text Box question as the independent variable and dependent variable. Click the Apply button, and you'll see charts showing data points, lines, and equations. Please click here for more information.
Please click here for more information.
We support the following statistical tools. Please see this guide for more information. If you need a tool that we don't offer, please feel free to let us know, and we'll do our best to suit your needs.
- Percentage on categorical data
- Percentage, mean, median, mode on ordinal data
- Mean, median, mode, standard deviation on quantitative data
- Independent samples student t test
- One sample student t test
- Paired samples student t Test
- Chi-square test of independence
- One-way ANOVA
- Simple linear regression
- Polynomial regression
Yes. We will provide a link to each language version of your survey, and you can see the results of each language separately or combine them together.
For a survey you created, you can export individual responses in text, XML, and Excel formats. You can also export its data trend, summary, and cross tabulation results in PDF.
For someone else's survey, you must be qualified to access its results. If the survey creator allows the public to view the results, or if you're one of the individuals the creator chooses to share the results with, then you'll be able to export whatever results the survey creator has chosen to share.
You can export all the responses you collected into a single Excel or text file. You simply need to open your survey, and then click Analyze, Results, Individual Responses, and the Apply button. After this, click Export, and you'll see the format to download. Please see the following screenshots:
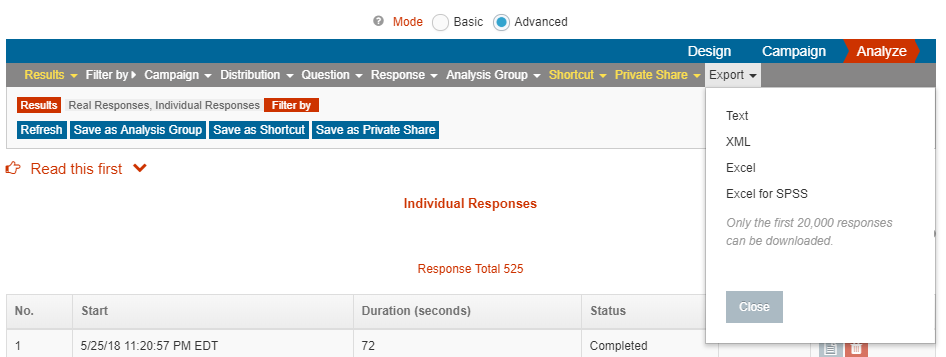
Please note that the export time depends on the number of a survey's questions and responses. While waiting for the completion of your download, you can open another browser window or tab to continue using our website.
You have two ways to export these answers. The first is to export all responses through the Individual Responses view, which will include the answers to all questions for each response. The second way is to open your survey and click Analyze to see the Summary view of your survey. For each text box question, slider question, and the "Other" choice of a multiple choice question, you can see a menu bar similar to the following. You can download all answers into a text or Excel file.

The summary of answers to a multiple choice question can be displayed through bar graphs, and you can export it into a PDF file. If the question also accepts free text answers, then you can't export all text answers into the same PDF file. The reason is that they are answer details, not a summary. Another reason is that there could be thousands of text answers or even more in some surveys. To get all text answers to a multiple choice question, you need to export them separately. You can export them from the question's summary, or you can export individual responses of a survey that include the answer details for all questions.
We don't have such a report in our system. The reason is that such a report could be very long in case of a large number of responses to a survey with text box questions. Besides, a chart displays summary information, while the answers to a text box question are just details. They are two different types of information.
The best way is to export the survey's responses into an XML or Excel file and import them into the analytical tool of your choice.
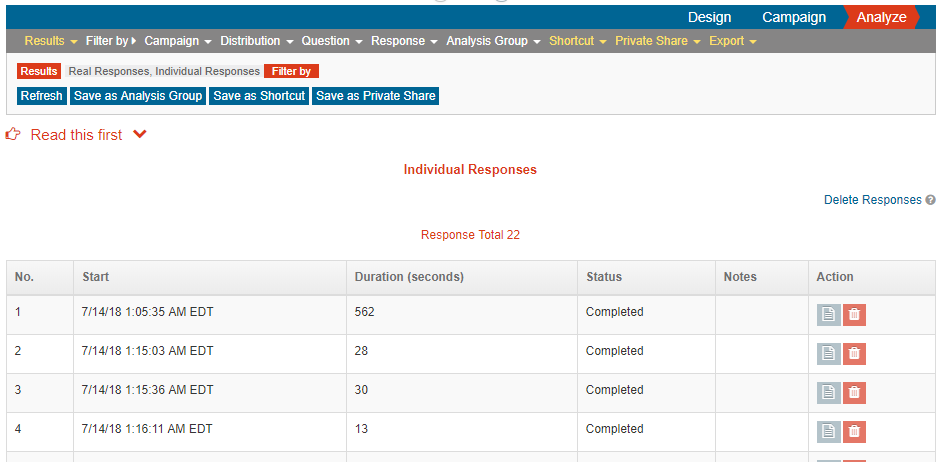
As a survey creator, you can see the details of each individual response to your survey. Open your survey, click Analyze, Results, Individual Responses, and the Apply button. Now, you should be looking at the list of responses. Click the Details button in the Action column for the details of a response.
A mandatory question is ignored if it is skipped through a skip rule or removed via a removal rule. Besides, a participant can quit a survey before answering a mandatory question.
A survey creator can't edit any responses. However, we allow the survey creator to add or delete responses.
We don't allow participants to modify responses. The only way to change a response is for a survey creator to delete the old response and ask the participant to take the survey again. In most situations, the participant simply needs to take it using a different browser. In other situations, the survey creator must open a survey in the Advanced mode, click Campaign, open a specific campaign, click Restrictions, and uncheck the following options for "Prevent Repeated Responses from the Same Participant":
- One Response per Browser
- One Response per Account, Individual Access Code, or Email Address in an Email Distribution
Please use the following screenshot to find these options.
Only survey creators can delete responses. As the survey creator, you can delete any response from your survey. Open your survey and click Analyze, Results, Individual Responses, and the Apply button. Now, you should see a list of individual responses. There's a column called Action, and there's a delete button in this column for each response. You can use this to delete individual responses.
You can also delete a batch of responses in two other ways. In the Analyze page shown above, you can select a specific set of responses by filtering out other responses. Once you are done filtering, you can click the "Delete Responses" link in the right hand side. This link deletes all the responses that meet the current "Filter by" conditions.
As another way of deleting responses in batch, you can open your survey in the Advanced mode and click Campaign. On this page, you can delete all responses of a particular campaign. On the Distributions page of a campaign, you can delete all responses of a particular distribution.
Our system is able to record the computer's internet address of each survey participant. However, the mapping of a computer's internet address to its actual location is an estimate sometimes.
Please click here for more information.
Go to the Time Zone page under Account Settings to choose your time zone. If you cannot find your city in the list of available time zones, choose one that is the same time zone as your city. Once you choose your time zone, you can see your local time displayed for each response in the Individual Response view under Analyze.
You can see it in the Advanced mode. On the Campaign page, you can see the total number of likes and dislikes each of your campaigns has received.
You can see it in the Advanced mode. On the Campaign page, you can see the total number of accounts that have added your survey to their watch lists. Note that we don't reveal the names of these accounts.
You can see it in the Advanced mode. If you open a specific campaign, you'll see the Comments page. Clicking on it will show you all the comments your campaign has received to date.
No. You can use the results you find at AllCounted in other places without prior permission. However, you're required to credit the survey creator (if shown in the survey) and AllCounted as the source of the information by explicitly citing the creator of the survey you use, the web link of the survey, and AllCounted.com.
There are two places to look for the survey creator's contact information: on the survey itself and on their Personal Page. If the creator has chosen to list contact information such as a website or Facebook page, you'll find the information there. In addition, we also provide message and friend request functions. If the creator has chosen to enable these functions, you can contact them through one of them.
As a participant, you may be able to have access to the results of some surveys based on how the share requirements are set by survey creators. In order for AllCounted to remember you as a participant in a particular survey, the safest way is to sign into the website, take a survey, and remain signed in while using our website. Another benefit for signing in is that you can track all the surveys you took and how you answered each question. If you don't sign in when taking a survey, then we will treat you as a participant for that survey during your session on the website. If you don't have any website activity for a long period of time, your session will end, and our website won't treat you as a participant any more.
The survey creator decides whether or not to share the results of their survey. The creator has the option to share results either with the general public, only with participants, or with certain individuals. If you can't find a survey's results, please contact the survey creator.
To make a survey searchable on our site, you need to make it searchable through the Publish page under Campaign. Besides, you need to select an option other than "Never" for "When to Share" on the Share page.
Note that our site often scans surveys and makes some not searchable because of the privacy and other reasons.
Collaboration
If you need help from another trusted user about a specific survey, you can add the user as a co-author to the survey. To do this, you have to open your survey in the Advanced mode. This person needs to have an account on our site, and you need this person's primary email address. Note that the user is able to view and manage this survey, including deleting its data.
You can add a co-author to your survey through the Co-Author page under Design in the Advanced mode.
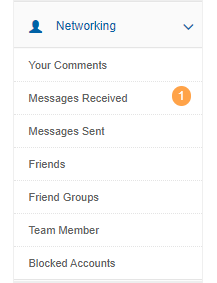
The user you invited can accept your invitation from within the message you sent. The user can open the message in two ways: the alert next to the user's display name or the Message Received page under the Networking menu.

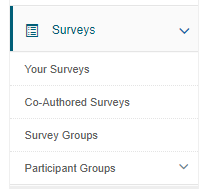
After accepting your invitation, the user can access your survey through the Co-Authored Surveys page under the Surveys menu.
The team member is one of the collaborative features we offer. When you need a trusted person to help create your surveys or manage your account, you can add the person as a team member of your account. Note that when you add one as your team member, you don't automatically become a team member of that person. In addition, you need to be careful because team members have the ability to perform create, update, view, and delete operations on all your data except deleting your account.
You can invite someone to be your team member through the Team Member page under the Networking menu. To become a team member, the invited person needs to create an account in our system first. Your invitation will send a message to the person, and the person can accept your invitation from the Message Received page under the Networking menu. After the invitation is accepted, the person's display name becomes a dropdown list, from which the person can access your account and everything in your account.
Social Networking
You can network with other people at AllCounted as a survey creator, account user, or survey commenter. As a creator, you can permit other people to message you, send you a friend request, or leave a comment about your survey. Allowing comments about your survey can generate a lot of information about your survey as well as interaction among participants. Such information and interaction could be very helpful to you. You can even grow your audience for future surveys through our features such as friends and friend groups. You can send your survey to a group of friends by simply choosing it without the need to manually enter their email addresses. As an account user, you have a special page called Personal Page, through which you can allow others to find and contact you. You can build your network of friends too. As a commenter on a survey, you can allow other people to interact with you and find like-minded friends.
The person you want to add must have an account at AllCounted. You can add a friend directly by entering your friend's primary email address on the Friends page. Another option is to send a friend request from the link of a survey creator or a commenter's link. You can also send a friend request through the person's Personal Page. When you send a friend request, the person must accept your request in order for you to become friends mutually.
Friend groups make it easier to manage your network of friends if you have many. Besides, if you create a survey and send it to them, you simply choose a group without the need to manually enter their email addresses.
Our friend request feature poses little risk when you add people you don't personally know. We don't ask our users for sensitive information, nor do we keep any on file except an email address. Note that you have the option of deleting a friend and blocking any account from contacting you.
You can't change its appearance in the current version of our website. However, you can update the introduction about yourself. You can also control which surveys to display to visitors on this page and what visitors can view about your surveys based on the share requirements you set on your surveys.
Under Account Settings, you can disable Personal Page and prevent people from seeing your surveys or sending you messages or friend requests. As a survey creator, you can choose not to display your display name and other information such as your website and Facebook page in your surveys. You can also disable the comments feature for your particular survey, which will completely block any interaction among participants. As an account user, you can choose not to provide your information such as your website and Facebook page in your account.